Friday, November 28, 2008

Serving of Fruit


Don’t think of it as dessert, think of it as a way to get one of your daily servings of fruit.

Pears Poached in Port
Printable Recipe

1 750-milliliter bottle ruby port
1 cup sugar
1 cinnamon stick
2 cloves
2 strips lemon zest
1 strip orange zest
1 vanilla bean
6 Bosc pears, ripe but firm
2 tablespoons freshly squeezed lemon juice

Combine the port, sugar, cinnamon, cloves, lemon zest, and orange zest in a small nonreactive pot. Cut the vanilla bean in half lengthwise, scrape out the seeds, and add both the pod and the seeds to the pot. Heat until the sugar dissolves. Peel the pears and core them through the blossom end with a melon baller, leaving the stem end intact. Add the pears to the pot and drape them with a piece of cheesecloth. Bring to a boil and simmer for 18 to 20 minutes, or until tender. Using a slotted spoon, remove the pears to a plate. Boil the poaching liquid another 14 to 16 minutes, or until thickened and slightly syrupy. Stir in the lemon juice, strain through a fine mesh sieve, and let cool slightly. Arrange the pears on individual plates, drizzle with the sauce, and serve immediately.

Serves 6. May be served warm or at room temperature. Perfect with gingersnap cookies. To obtain strips of zest from a lemon and an orange, simply use a vegetable peeler. The cheesecloth will keep the pears completely submerged beneath the poaching liquid so that they cook and color evenly. Leftover sauce, should you have any, is fantastic over ice cream.

Wednesday, November 26, 2008

Capers

My first encounter with a caper was not an altogether pleasant one. It was my first time working in a fancy restaurant. I couldn’t believe that I had actually gotten the job, I had no idea what I was doing, and I was insecure about it, too. The chef asked me to make the rémoulade for the calamari. I had never heard of rémoulade. The long list of ingredients included capers, and, of course, I had never hear of them either. I remember my curiosity at the new ingredient, seeing them swimming in their greenish liquid—were they animal, vegetable, or mineral? I remember the moment I opened the big jar, sticking my nose deep inside, taking a big whiff, and recoiling in disgust at the pungent, vinegary smell. I remember glancing around me to see if anyone had noticed. And then I remember punching the button on the food processor hard, until the capers became an indistinguishable part of that strange sauce, until they disappeared completely. What I don’t remember is tasting the rémoulade.

I think the first time I actually tasted a caper was in turkey piccata. Given my one and only previous experience with capers, I was pretty apprehensive to try it. But a coworker’s exclamation, “Oh, I love piccata!” was enough to convince me. Along with a perfectly reasonable explanation that a caper’s nothing but a pickled flour bud.

Now, I always keep a big jar of capers on hand. I put them in salad dressings and pasta sauces, and they’re a fantastic substitute for pickles or pickle relish in potato salads, pasta salads, and tuna salads. Now, capers are one of my favorite ingredients.


Chicken Piccata
Printable Recipe

2 8-ounce boneless, skinless chicken breasts
Kosher salt
Freshly ground black pepper
¼ cup all-purpose flour
2 tablespoons extra virgin olive oil
3 tablespoons unsalted butter
½ cup white wine
2 tablespoons freshly squeezed lemon juice
2 tablespoons capers
2 tablespoons minced Italian parsley

Gently pound out the chicken breasts to an even thickness with a meat pounder. Season generously with salt and pepper. Dip into the flour to coat and shake off any excess. Heat a large, heavy sauté pan over medium heat until very hot but not smoking. Add the oil and 1 tablespoon of the butter and swirl to coat the bottom of the pan. Add the chicken breasts skinned side down and sauté for 4 to 5 minutes, or until golden brown. Using tongs, turn the chicken breasts and continue to sauté another 3 to 4 minutes, or until just cooked through. The chicken breasts will be firm to the touch and the juices will run clear when they are just cooked through. Remove the chicken breasts to a plate and tent with foil to keep warm.

Add the wine, lemon juice, and capers to the pan and simmer, scraping up the brown bits from the bottom of the pan with a heat-proof spatula, for 4 to 5 minutes, or until thickened and saucy. Add the parsley. Remove the pan from the heat and let cool for a minute or two. Whisk in the remaining 2 tablespoons of butter quickly, stir in any accumulated juices from the chicken breasts, and season to taste with salt and pepper. Return the chicken breasts to the pan and turn to coat with the sauce. Arrange the chicken breasts on individual plates, divide the sauce among them, and serve immediately.

Serves 2 very hungry people. Lovely on a bed of angel hair pasta. For 4 smaller portions, pound out the chicken breasts, cut each breast in half, and proceed with the recipe as directed. The recipe may be doubled, but the sauce will take a little more time to reduce. Also delicious with scaloppine of veal, pork, or even turkey.

Sunday, November 23, 2008

Apples

For some reason, I didn’t like cooked fruit when I was little. I liked it fine raw, just not cooked. I especially hated cooked apples. Not a single bite of cooked apple would pass these lips. I thought apple pie wasn’t worth eating, baked apples were yucky, apple sauce was gross, and stewed apples would just about make me cry. But my first bite of tarte tatin changed all of that.


Tarte Tatin
Printable Recipe

8 large Golden Delicious apples, peeled, halved, and cored
Juice of 1 lemon
1 cup sugar
4 tablespoons (½ stick) unsalted butter
1/3 cup water
1 8 to 9-ounce sheet puff pastry dough

Toss together the apples and lemon juice in a large bowl. Combine the sugar, butter, and water in a tarte tatin pan or a 10-inch, heavy sauté pan. Bring to a boil, brush down the sides of the pan with water, and boil for 10 to 12 minutes, or until caramelized. The sugar will be fragrant and a deep amber color when it is caramelized. Immediately add the apples cut side up, arranging them in neat overlapping circles.


Reduce the heat to medium-low and simmer for 50 to 60 minutes, or until the apples are tender.

Meanwhile, preheat the oven to 425ºF. On a lightly floured surface, roll out the puff pastry to an 11-inch square and cut out an 11-inch circle. Transfer the circle to a plate, reserving the scraps for another use, and refrigerate.

Remove the pan from the heat and let cool for about 5 minutes. Top the apples with the pastry circle, tucking it in around the edges, and cut a 1-inch X in the center. Transfer the pan to the oven and bake for 22 to 24 minutes, or until the crust is golden brown. Let cool for about 5 minutes and, using pot holders, carefully invert onto a serving platter. Let cool slightly, cut into portions, and serve.

Makes 1 10-inch tart, serving 8. Spectacular in the fall, when apples are at their best. And, of course, caramel is good in any season. Frozen puff pastry works perfectly, just thaw it in the refrigerator, not at room temperature. Golden Delicious apples are my favorite for this recipe, they keep their shape once cooked, and they taste silky and buttery. Be very careful when adding the apples to the caramel in the pan—caramel is extremely hot, and it will bubble up on contact with the apples. I like to cook the apples on the stovetop for quite a bit longer than usual, so that the all of the juices the apples exude have enough time to cook down. This method ensures that the crust does not become soggy once the tart is inverted.

Thursday, November 20, 2008

Comfort Food

No other food reminds me of my grandmother as much as matzoh balls. It’s funny, Baba wasn’t even known for her matzoh balls—she didn’t make them all that often, and when she did, my grandfather and I had a fantastic time teasing her because, though they were delicious and light and fluffy, her matzoh balls looked more like to matzoh blobs. Still, to this day, matzoh balls give me that warm, fuzzy feeling, just like Baba always did. Try them some chilly evening, you’ll feel as if you’ve just gotten a big, warm hug. Now that’s what I call comfort food.


Matzoh Balls in Broth
Printable Recipe

2 large eggs, at room temperature
4 tablespoons (½ stick) unsalted butter, at room temperature
1 tablespoon water
½ teaspoon kosher salt
Freshly ground black pepper
½ cup matzoh meal
Generous pinch baking powder
1 quart chicken broth

Whisk together the eggs, butter, water, salt, and a generous pinch of pepper in a large bowl. Mix together the matzoh meal and baking powder in a small bowl. Stir the matzoh meal mixture into the egg mixture. Cover with plastic wrap and refrigerate for about an hour, or until chilled. Divide the mixture into 6 portions and form each portion into a ball. Arrange on a plate, cover with plastic wrap, and refrigerate for another 15 minutes, or until firm.

Bring the broth to a simmer in a small pot. Add the matzoh balls and simmer, covered, for about 20 minutes, or until tender and cooked through. Ladle into individual bowls and serve immediately.

Makes 2 generous servings. For a more substantial meal, add diced celery and carrots to the broth and simmer until tender before adding the matzoh balls. And add a bit of shredded cooked chicken near the end of the cooking time. This recipe can be doubled.

Monday, November 17, 2008

Not Pumpkin Pie

I confess, I don’t like pumpkin pie. Even if I liked pumpkin pie, I couldn’t possibly eat a whole slice after Thanksgiving dinner, unless I wanted to know what the stuffed turkey felt like.


Pumpkin Crème Brûlées
Printable Recipe

2 ½ cups heavy cream
6 large egg yolks
1/3 cup sugar
6 ounces pumpkin puree
1 teaspoon vanilla extract
¾ teaspoon cinnamon
¼ teaspoon freshly grated nutmeg
¼ teaspoon kosher salt
¼ cup Turbinado sugar

Preheat the oven to 350˚F. Heat the cream to a simmer in a small saucepan. Whisk together the yolks and sugar in a medium bowl. Continue whisking while adding the hot cream in a thin stream. Strain through a fine mesh sieve. Stir in the pumpkin, vanilla, cinnamon, nutmeg, and salt and skim off any foam from the surface. Divide the mixture among 8 crème brûlée dishes and place them into a roasting pan. Add enough hot water to the roasting pan to come half way up the sides of the crème brûlée dishes and bake for 22 to 24 minutes, or until just set. Remove from the water bath and let cool to room temperature. Refrigerate for 3 to 4 hours, or until firm.

Top 1 crème brûlée with 1 ½ teaspoons of the Turbinado sugar and swirl to coat. Caramelize the sugar with a culinary torch. Finish the remaining crème brûlées with the remaining Turbinado sugar in the same manner. Serve immediately.

Serves 8. Canned pumpkin puree is perfect for this recipe. You can tell that the crème brûlées are done when they jiggle like gelatin. If you don’t have crème brûlée dishes, you can use ramekins, but they will take slightly longer to bake. And if you don’t have a culinary torch, you can caramelize the sugar topping under a preheated broiler. Crème brûlées may be baked a day or two in advance and kept covered with plastic wrap in the refrigerator. Add Turbinado sugar and caramelize just before serving.

Friday, November 14, 2008

Quick Roasted


Crispy and savory and golden brown and delicious, this is. High heat does amazing stuff. It won’t be long before your steamer starts to feel neglected.

Quick Roasted Broccoli & Cauliflower
Printable Recipe

12 ounces broccoli florets
12 ounces cauliflower florets
1/3 cup extra virgin olive oil
Kosher salt
Freshly ground black pepper

Preheat the oven to 450˚F. Toss together the broccoli, cauliflower, and oil in a large bowl, making sure that the florets are evenly coated. Season generously with salt and pepper. Spread on a baking tray and roast for about 25 minutes, or until golden brown. Transfer to a bowl and serve immediately.

Serves 6. For the best results, be sure not to overcrowd the pan. If you like, drizzle with freshly squeezed lemon juice before serving.

Wednesday, November 12, 2008

Thanksgiving Menu

Everybody already wants to know what’s on the Thanksgiving dinner menu. Will it be turkey, duck, or game hens? A pumpkin mousse tart or Pumpkin Crème Brûlées? I haven’t decided yet. The only thing I know for sure is, I want a traditional dressing. In fact, I’ve been craving my traditional dressing so much that I just couldn’t wait until Thanksgiving to have some. So I made it for dinner last night, it was the perfect accompaniment to a roast chicken. The aroma of sage is still in the air.


Traditional Sourdough Dressing
Printable Recipe

1 1-pound loaf sourdough bread, cut into ¾-inch cubes
¼ cup extra virgin olive oil
2 tablespoons unsalted butter, plus more for greasing the baking dish
1 large yellow onion, diced
4 stalks celery, diced
1 large green bell pepper, diced
4 to 6 cloves garlic, minced
¼ cup minced fresh sage
1 tablespoon minced fresh thyme
3 large eggs
2 ¾ cups chicken broth
Kosher salt
Freshly ground black pepper

Preheat the oven to 350˚F. Spread the bread cubes on a baking tray and bake for about 35 minutes, or until lightly toasted and dry. Meanwhile, heat a large, heavy sauté pan over medium heat until hot but not smoking. Add the oil and butter and swirl to coat the bottom of the pan. Add the onion and sauté for 6 to 7 minutes, or until soft. Add the celery and bell pepper and sauté for another 6 to 7 minutes, or until soft. Add the garlic, sage, and thyme and stir for a minute or so until fragrant. Let cool.

Butter a 9×13-inch baking dish. Lightly beat the eggs in a small bowl. Add the broth and stir to combine. Mix together the bread cubes, vegetable mixture, broth mixture, and a generous pinch of salt and pepper in a large bowl until all of the liquid has been absorbed. Transfer to the baking dish and cover tightly with foil. Bake for 40 minutes. Uncover, increase the temperature to 425˚F, and bake for another 25 to 30 minutes, or until golden brown. Serve immediately or cover and keep warm for as long as an hour.

Serves 8 to 10. Also delicious with the addition of sautéed mushrooms, oysters, or browned breakfast sausage crumbles. May be prepared up to a day in advance and kept refrigerated. Remove from the refrigerator about an hour before baking.

Friday, November 7, 2008

Cutting Onions: Dice & Chop

How do you keep from crying when you chop an onion? I’ve heard of all sorts of creative suggestions: soak it, refrigerate it, chew gum, turn on a fan, keep your mouth shut, burn a candle, hold a match between your lips—I wonder if you’re supposed to light it first, wear goggles—how fashionable, or cut it under water—sounds slippery, which is scary when there’s a knife involved, and I don’t think that my cutting board would fit into the sink anyhow. Oh wait…maybe they mean underwater like in a swimming pool…now the goggles are starting to make sense…riiight. Did I say creative suggestions? I think I meant silly or questionable or downright absurd. So here’s my suggestion: learn how to chop an onion like the pros, quickly and efficiently and with a sharp knife. You won’t shed a tear. And, OK, I’ll admit that refrigerating onions does help a bit too.

To dice, or chop, an onion, start by trimming the root.


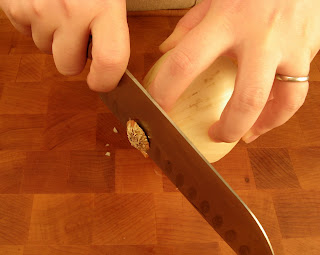
(Don’t actually cut off the root end, just trim it to keep the little rootlets from getting mixed in with the rest of the onion later. Also, the root end of the onion will act as a little handle, keeping the onion together and making it easier to hold onto as you cut it, especially as you reach the end.) Cut off the stem end.
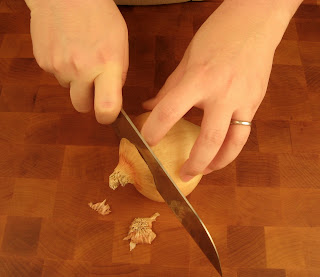

Peel the onion.


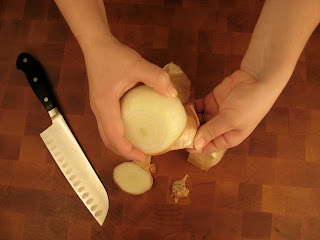
Place the onion stem end down, and cut it in half.


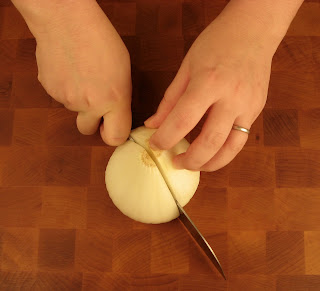
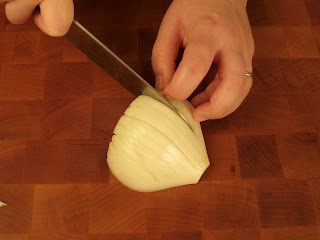
Working with one half at a time, position the onion near the edge of your cutting board (so that your knuckles don’t hit the board as you work) with the cut side down and the stem end facing your knife. Make a series of horizontal cuts parallel to the cutting board.


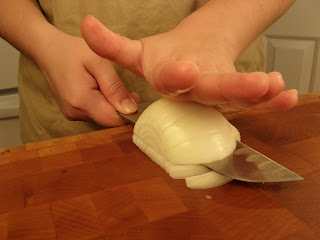
But don’t cut all the way through.


And be careful to keep your fingers out of the way of the blade.


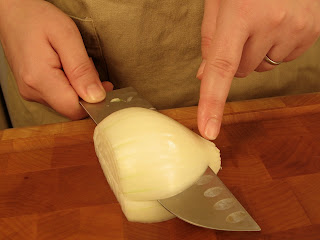
Reposition the onion in the center of your cutting board with the stem end facing the tip of your knife and make a series of vertical cuts parallel to the plane from the root end to the stem end of the onion.


Again, don’t cut all the way through the root end.


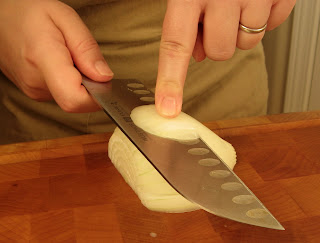
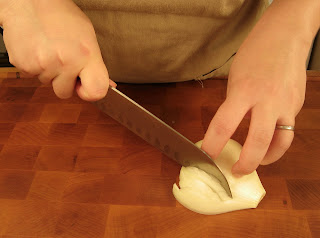
Finally, reposition the onion in the center of your cutting board with the stem end facing your knife and make a series of cuts at a 90-degree angle to the other cuts, as if you were just slicing the onion.


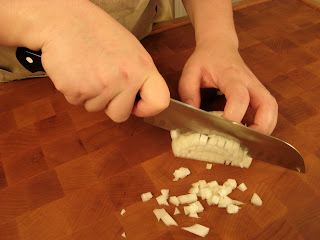
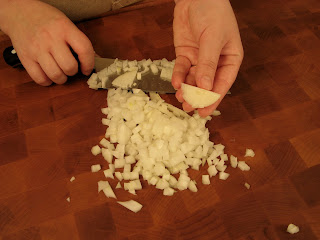
When you reach the root end, discard it.


Onions diced in this manner are relatively consistent, which means they will cook very evenly.

Some cooks like to switch the order of the first and second series of cuts, making the cuts from the root to the stem of the onion first and then making the cuts parallel to the board. But since the most precarious part of dicing an onion is cutting horizontally, it really is easiest to do that first, while the onion half is still intact.

The distance between cuts determines the size of the dice.


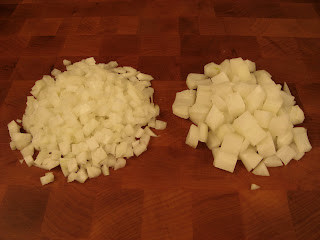
For a fine dice, make the cuts closer together, and conversely, for a large dice, make the cuts farther apart. A fresh salsa is great with finely diced onions. A medium dice is usually a good choice for sautéing. Onions cut into a large dice are best for roasting, stewing, and even stir-frying.

This very same technique, but of course on a smaller scale, is used for mincing shallots.

Click here for information on how to slice and julienne onions.

Tuesday, November 4, 2008

Preparing Wild Mushrooms

Whether you forage for them yourself like I do, or you pick them up at the market, fresh wild mushrooms, rare seasonal treat that they are, should be treated with lots of care. Wild mushrooms keep best stored in a paper bag in the refrigerator.

To prepare wild mushrooms, simply brush them clean with a dry pastry brush.


You can use a moist paper towel for the most stubborn dirt, but otherwise avoid cleaning mushrooms with water as they will become slimy. Trim as necessary with a paring knife.


Don’t worry too much about removing every last speck, after all, wild mushrooms do come from the forest floor.

To preserve their natural shapes, tear large chanterelle, hedgehog, oyster, and maitake mushrooms into smaller pieces.


Slice lobster, porcini, and morel mushrooms into bite-size pieces with a knife.


The wild mushrooms are now ready to cook.

Saturday, November 1, 2008

On Top of Spaghetti


I think of this as my no-fuss meatball recipe—baking meatballs is much easier and less messy than frying them, and they still turn out golden brown and delicious.

Giant Italian Meatballs
Printable Recipe

2 ½ pounds 85% lean ground beef
2 cups panko breadcrumbs
3 large eggs
1 cup grated Parmegiano-Reggiano
¼ cup minced Italian parsley
4 to 6 cloves garlic, minced
2 tablespoons tomato paste
Kosher salt
Freshly ground black pepper

Preheat the oven to 400˚F. Mix together the ground beef, breadcrumbs, eggs, Parmegiano, parsley, garlic, tomato paste, and a generous pinch of salt and pepper in a large bowl. Divide the mixture into 12 portions and form each portion into a ball. Arrange on a parchment-lined baking tray and bake for about 45 minutes, or until cooked through. Serve immediately.

Makes 12 very big meatballs, enough to serve 6 people with hearty appetites. Serve over spaghetti with marinara sauce, of course. Also wonderful in meatball sandwiches.

Blog Widget by LinkWithin