Showing posts with label Onions. Show all posts

Friday, May 1, 2009

Wow, That's a Lot of Leeks


I found the most beautiful leeks at the farmers market. They weren’t on my shopping list, but I couldn’t resist. I immediately thought Creamed Leeks and picked out four of the fattest ones I could find. My husband looked intimidated by all those leeks, but I assured him that leeks are sweet and subtle, gentle even, comparing to onions. I served the leeks with our dinner. He just nodded his approval as he chewed, too busy to say anything. And the leftovers were fantastic tucked into Eggs en Cocotte.


Creamed Leeks
Printable Recipe

2 tablespoons unsalted butter
4 large leeks, pale parts only, sliced
1 cup heavy cream
Generous pinch freshly grated nutmeg
Kosher salt
Freshly ground black pepper

Heat a large, heavy sauté pan over medium heat until hot but not smoking. Add the butter and swirl to coat the bottom of the pan. Add the leeks and sauté for 14 to 16 minutes, or until soft. Add the cream and nutmeg and simmer for 3 to 4 minutes, or until thickened. Season to taste with salt and pepper, transfer to a bowl, and serve immediately.

Serves 6 to 8. This snappy side dish is rich and comforting. It’s a perfect match for steak, chicken, or salmon. Leeks tend to be very dirty, so rinse them thoroughly after you slice them. For a delicious variation, substitute crème fraîche for a portion of the heavy cream. Also wonderful as a gratin—simply transfer the Creamed Leeks to a buttered baking dish, sprinkle with grated Parmegiano-Reggiano, and broil until bubbling around the edges and golden brown on top.

Tuesday, April 7, 2009

Spring Market

Up here in the Pacific Northwest spring arrives later than in the rest of the country, especially when it comes to the growing season. For us, early April usually means a chill in the air, grey skies, and more rain. While family and friends located in warmer climes are already flooded with asparagus and rhubarb, I’m still waiting impatiently. Our farmers market only has a few greens, veggie starts, and cut daffodils.

So I went to the farmers market over the weekend not expecting too much. But there was a wonderful surprise waiting for me—ramps!


Pristine ramps, so fresh and alive. In my anticipation of asparagus season, I had forgotten all about the ramps. I bought one bunch, and then thought better of it and went back for another.


I found one other thing at the farmers market—inspiration. I can wait for the other spring produce; this week we’ll be having lightly sautéed ramp greens and grilled ramp stems and Pickled Ramps.


Pickled Ramps
Printable Recipe

½ cup white vinegar
½ cup water
½ cup sugar
1 tablespoon kosher salt
½ teaspoon yellow mustard seeds
½ teaspoon coriander seeds
½ teaspoon black peppercorns
3 allspice berries
1 bay leaf
½ pound ramps, cleaned and blanched

Combine the vinegar, water, sugar, salt, mustard seeds, coriander, black peppercorns, allspice, and bay leaf in a small saucepan and bring to a boil. Place the ramps into a medium jar and add the hot vinegar mixture. Let cool to room temperature, cover, and refrigerate overnight before serving.


Makes about 6 to 8 servings. Ramps tend to be very dirty. To prepare them, trim the root ends, peel away any dried or dirty layers, and rinse them thoroughly. If the leaves are dried, mushy, or discolored, trim them too. Pickled Ramps keep for weeks tightly sealed in the refrigerator. Don’t hesitate to double the recipe because they go fast. These sweet and sour pickles are perfect on steak sandwiches. In case you’ve never had a ramp, they’re related to onions, and they taste like a cross between onions and pungent, pungent garlic. Ramps are absolutely delicious, but what I’m trying to say is don’t plan on getting too close to your sweetheart after you’ve dined on ramps.

Sunday, March 15, 2009

Peeling Tomatoes, Stone Fruit & More

Have you ever noticed that, while the flesh of tomatoes and stone fruit will soften, the skin seems to remain intact no matter how long it cooks? And that the leathery bits of skin can just about ruin whatever dish they’re in? Tomato sauce or peach pie with scraps of tough peel—yuck. But how do you peel tomatoes or stone fruit without ending up with bruised fruit and a big juicy mess? Knives and vegetable peelers are no help here.

Well, do you remember Blanch? It’s been a while since I introduced you. Blanching is the answer! Blanching fruits such as tomatoes, peaches, nectarines, plums, and apricots will loosen their skins and make peeling a breeze.

To peel tomatoes or stone fruit, bring a large pot of water to a rolling boil. The larger the pot and the more water, the faster the water will return to a boil after the fruit is added, and the faster the skin will release. And the faster the skin releases, the more appealing the appearance, texture, and flavor of the fruit will be. Keep in mind that the goal is to loosen the skin but not cook the fruit. Add plenty of salt, enough to make the water taste slightly briny. Using a paring knife, cut a small X in the bottom of the fruit.


Add the fruit to the pot of boiling water and boil for 20 to 30 seconds.


The skin of the fruit will usually start to crack. Using a slotted spoon or wire skimmer, quickly transfer the fruit to a bowl of ice-cold water to stop the cooking process, this is known as shocking.


Once the fruit is cool, drain it thoroughly. Use the paring knife to remove the peel, starting at the X.


The skin will slip right off.


This technique can also be used to peel pearl onions, fava beans, and almonds, but it’s not necessary to score them with an X first. Blanch them for about a minute, then shock them in ice water. Use a paring knife to cut off the root end of pearl onions. Break open fava bean skins with your thumbnail. Then squeeze each pearl onion, fava bean, or almond between your thumb and forefinger, and it will pop right out of its skin.

If you’re peeling a large quantity of one of these foods, blanch it in batches.

Friday, November 7, 2008

Cutting Onions: Dice & Chop

How do you keep from crying when you chop an onion? I’ve heard of all sorts of creative suggestions: soak it, refrigerate it, chew gum, turn on a fan, keep your mouth shut, burn a candle, hold a match between your lips—I wonder if you’re supposed to light it first, wear goggles—how fashionable, or cut it under water—sounds slippery, which is scary when there’s a knife involved, and I don’t think that my cutting board would fit into the sink anyhow. Oh wait…maybe they mean underwater like in a swimming pool…now the goggles are starting to make sense…riiight. Did I say creative suggestions? I think I meant silly or questionable or downright absurd. So here’s my suggestion: learn how to chop an onion like the pros, quickly and efficiently and with a sharp knife. You won’t shed a tear. And, OK, I’ll admit that refrigerating onions does help a bit too.

To dice, or chop, an onion, start by trimming the root.
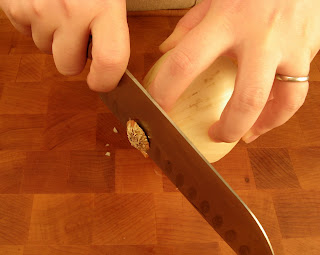

(Don’t actually cut off the root end, just trim it to keep the little rootlets from getting mixed in with the rest of the onion later. Also, the root end of the onion will act as a little handle, keeping the onion together and making it easier to hold onto as you cut it, especially as you reach the end.) Cut off the stem end.
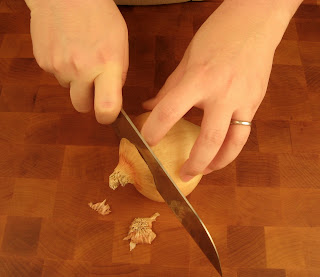

Peel the onion.
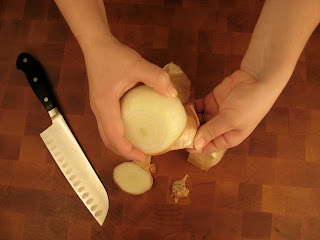

Place the onion stem end down, and cut it in half.
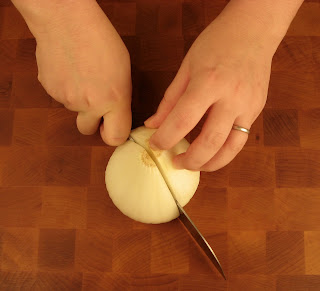

Working with one half at a time, position the onion near the edge of your cutting board (so that your knuckles don’t hit the board as you work) with the cut side down and the stem end facing your knife. Make a series of horizontal cuts parallel to the cutting board.
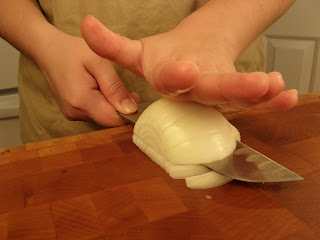

But don’t cut all the way through.
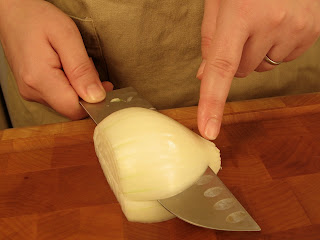

And be careful to keep your fingers out of the way of the blade.
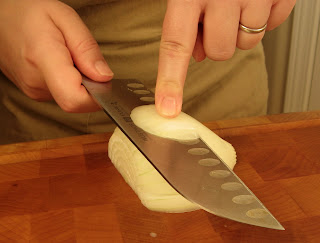

Reposition the onion in the center of your cutting board with the stem end facing the tip of your knife and make a series of vertical cuts parallel to the plane from the root end to the stem end of the onion.
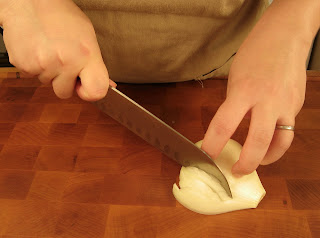

Again, don’t cut all the way through the root end.
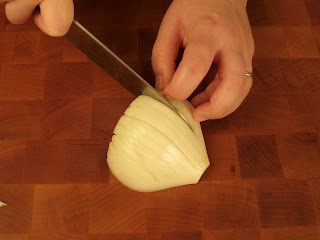

Finally, reposition the onion in the center of your cutting board with the stem end facing your knife and make a series of cuts at a 90-degree angle to the other cuts, as if you were just slicing the onion.
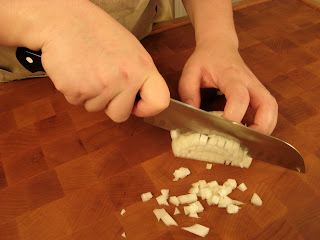

When you reach the root end, discard it.
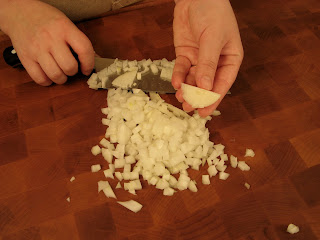

Onions diced in this manner are relatively consistent, which means they will cook very evenly.

Some cooks like to switch the order of the first and second series of cuts, making the cuts from the root to the stem of the onion first and then making the cuts parallel to the board. But since the most precarious part of dicing an onion is cutting horizontally, it really is easiest to do that first, while the onion half is still intact.

The distance between cuts determines the size of the dice.
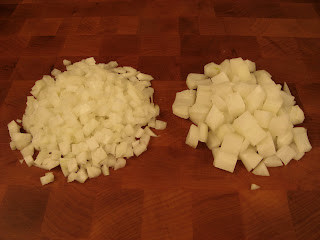

For a fine dice, make the cuts closer together, and conversely, for a large dice, make the cuts farther apart. A fresh salsa is great with finely diced onions. A medium dice is usually a good choice for sautéing. Onions cut into a large dice are best for roasting, stewing, and even stir-frying.

This very same technique, but of course on a smaller scale, is used for mincing shallots.

Click here for information on how to slice and julienne onions.

Saturday, September 13, 2008

Cutting Onions: Slice Versus Julienne

You may have already met julienne. Perhaps you’d like to get to know Julienne a little better.

Julienne works well with onions. But julienned onions are very different from sliced onions. Here’s how.

To slice an onion, start by trimming the root.


(Don’t actually cut off the root end, just trim it to keep the little rootlets from getting mixed in with the rest of the onion later. Also, the root end of the onion will act as a little handle, making it easier to hold onto the onion as you cut it, especially as you reach the end.) Cut off the stem end.


Peel the onion.


Position the onion in the center of your cutting board with the stem end facing your knife and cut slices of the desired thickness.


When you reach the root end, discard it. You can separate the slices into rings.


These are perfect for burgers and other sandwiches.

For half slices, which are great in salads, prepare and peel the onion as described above. Place the onion stem end down, and cut it in half.


Working with one half at a time, position the onion in the center of your cutting board cut side down and with the stem end facing your knife. Cut slices of the desired thickness.


When you reach the root end, discard it. The size of the resulting pieces can vary substantially; slices from the central layers of the onion will be much smaller than slices from the outer layers.


Julienne pieces of an onion look quite different—imagine them as very thin wedges of the onion. To julienne an onion, cut off the root end.


(This is the only onion knife cut where you would actually cut off the root end at the beginning.) Cut off the stem end and peel the onion. Stand the onion on one of its ends, and cut it in half. Working with one half at a time, position the onion in the center of your cutting board cut side down and with one of its round edges facing your knife. Since the onion is round, angle your knife sharply and begin cutting matchstick-size pieces.


Continue cutting in a radial manner, gradually changing the angle of the knife with each cut.


By the time you reach the middle of the onion, your knife should be at a 90-degree angle to the cutting board.


When you’re most of the way through, and it begins to feel a little unstable, flip over the onion.


And start again.


Put all these steps together, and it should look something like this.


The size of julienned onions is relatively consistent.


This means they will cook much more evenly than sliced onions and are a much better choice for sautéing, stir-frying, and caramelizing.


Click here for information on how to dice and chop onions.

Click here for information on how to julienne other foods.
Blog Widget by LinkWithin