Tuesday, December 28, 2010

Toast to the New Year

Happy New Year's, dear reader! I raise my glass to you. May 2011 bring you health, happiness, and delicious dishes.


Pomegranate-Grapefruit Champagne Sparklers
Printable Recipe

¼ cup pomegranate arils
6 ounces pomegranate juice, chilled
6 ounces freshly squeezed grapefruit juice, chilled
1 750-milliliter bottle sparkling wine, chilled

Divide the pomegranate arils among 6 champagne flutes. Combine the pomegranate juice and grapefruit juice in a pitcher or measuring cup with a spout and divide among the flutes. Divide the sparkling wine among the flutes and serve immediately.

Serves 6. Best in the wintertime, when pomegranates and grapefruit are plentiful. Use freshly pressed pomegranate juice or, if you can find it, Evolution Freshest Pomegranate juice. If you are squeezing juice fresh, you will need 1 to 2 large pomegranates and 1 large grapefruit for this recipe.

Wednesday, December 22, 2010

Give the Gift of Searing

Do you need a last minute gift idea for the cook in your life? Well, according to the St. Petersburg Times, Seared to Perfection would make a great gift. Smoke in Da Eye seems to think so too. I can't help but agree with them!


In other Seared to Perfection news…I'll be doing a cooking demo, tasting, and book signing at the Vancouver, Washington Whole Foods Market at 5:00PM and 5:45PM on Thursday, January 13. I'll be back at Whole Foods for another book signing during the Local Health & Wellness Fair from 12PM to 3PM on Saturday, January 22nd. Both of these events are free to the public, so come on by! And you know the Steaks with Chipotle Cream Sauce recipe that's been making the rounds? Now it's in the Staten Island Advance. Pardon the pun, but that recipe is HOT!

Saturday, December 18, 2010

Images of Alaska and Smoked Salmon Spread

Wild, wondrous, and wintry. Alaska in the cold months is breathtaking. The forests, covered in a sheet of snow and ice, look as though they are made of glass.


And they're teaming with wildlife even in the bitter weather. Timid moose calves venture to the edge of the glass forest to graze on twigs while mother moose watch from between the trees.


Incidentally, the Alaskan cookbook I got includes various recipes for moose.

My one big goal in Alaska was to eat as much king crab as possible.


Which I did.


But for the first time for me, food took a back seat to the scenery. You simply don't notice a grumbling belly when you're watching a dozen Dall sheep scurrying up and down a cliff side.


We were told that the appearance of such a large group of sheep is very rare, and the sight brought out all the area nature photographers.


(If you're a photography enthusiast, note I was the ONLY person using a black lens.)


It turns out my Alaskan cookbook also has lots of recipes for mountain sheep. I think those Alaskans will eat anything that moves.

We got to see a grizzly bear at a wildlife preserve.


My Alaskan cookbook has a few bear recipes too, but it seems like a bear would probably eat you before you could eat it.

This time of year daylight is fleeting.


The sun doesn't rise as much as it peeks above the horizon.


Mountains cast long shadows across the valley floor.


The perpetual dusk makes the cold sink in.


It's bone chilling.


And it looks as cold as it feels.


But do I retreat to the warmth of the indoors?


No, I brave the freezing temperatures to marvel a little longer.


I'm overwhelmed by Alaska's beauty.

Of course, it's inevitable that my attention eventually turns back to food…

There's no need for a recipe for king crab legs since they're simply reheated and served with drawn butter, so here's another seafood delicacy inspired by our Alaskan adventures.

But first…Here's Smoke In Da Eye's review of Seared to Perfection. And in case you missed it, here's the demo I did of the Sage-Rubbed Pork Loin Chops with Cranberry-Pear Compote from Seared to Perfection on KOIN Studio 6 yesterday. I'm happy to report that I wasn't nearly as nervous as I thought I would be!


Smoked Salmon Spread
Printable Recipe

8 ounces cream cheese, at room temperature
5 ½ ounces hot-smoked salmon, skinned
2 tablespoons minced fresh dill
1 tablespoon minced fresh chives
½ teaspoon freshly squeezed lemon juice
Generous pinch cayenne pepper
Freshly ground black pepper

Combine the cream cheese, smoked salmon, dill, chives, lemon juice, and cayenne in a food processor and pulse until smooth. Season to taste with pepper.

Makes about 2 cups. Serve with crackers, baguette slices, or cucumber sticks. Also makes a great bagel schmear. Keeps for a couple of days tightly sealed in the refrigerator. It’s best at room temperature, so take it out of the fridge about half an hour before serving.

Saturday, December 11, 2010

Last Chance for Chanterelles

This way to the mushrooms.


This fall, work and general busyness almost kept us from making the long and bumpy trip down the winding dirt road that leads to our secret foraging spot.


Luckily we did manage to make it out during the final moments of chanterelle season. The first freeze found many of the mushrooms before we did, and spent chanterelles littered the forest floor. We mourned their passing as we collected the specimens still in their prime.


At least the ones our helpful pup didn't trample.


The weather turned as if to say, "It's too late!"


But we braved the mud and the cold and the rain to find gold.


Then, as we made our way out of the woods, the snow started.


And just like that, chanterelle season was over.

Before I get to what I made with our prize…Remember how I told you that the Steaks with Chipotle Cream Sauce recipe from Seared to Perfection was featured in The Washington Post? Well since then, the recipe has appeared in the Daily Herald, the Pioneer Press, the Northwest Herald, The Buffalo News, The Seattle Times, and The Herald Sun. It even made it all the way to Qatar in The Peninsula! Now, how cool is that?!

Anyway, back to the chanterelles…


Chicken Braised with Chanterelles
Printable Recipe

4 10 to 12-ounce chicken leg quarters
Kosher salt
Freshly ground black pepper
1 tablespoon extra virgin olive oil
¾ pound chanterelles, torn into bite-size pieces
2 strips bacon, diced
4 shallots, sliced
¼ cup white wine
2 cups chicken broth
¼ cup cream
1 bay leaf
2 sprigs thyme

Season the chicken leg quarters generously with salt and pepper and set aside at room temperature for about half an hour.

Heat a large, heavy pot over medium-high heat until very hot but not smoking. Add the oil and swirl to coat the bottom of the pot. Add the chicken leg quarters skin side down and cook without disturbing for 4 to 5 minutes, or until they release from the pan and are crusty and brown. Using tongs, turn the chicken leg quarters and continue to cook over medium-high heat another 4 to 5 minutes, or until brown.* The chicken should not be cooked through at this point. Remove the chicken to a plate. Add the chanterelles to the pot and sauté for 4 to 5 minutes, or until soft. Using a slotted spoon, remove the chanterelles to the plate with the chicken. Reduce the heat to medium-low, add the bacon to the pot, and fry, tossing frequently, for 6 to 7 minutes, or until rendered. Using the slotted spoon, remove the bacon to the plate with the chicken.

Discard all but 1 tablespoon of the fat from the pot. Add the shallots to the pot and sauté for 2 to 3 minutes, or until soft. Add the wine and simmer for a minute or so, scraping up the brown bits from the bottom of the pan with a heat-proof spatula. Return the chicken, chanterelles, and bacon to the pot and add the broth, cream, bay leaf, and thyme. Bring to a boil and simmer for 40 to 45 minutes, or until the chicken is fork tender and the meat shrinks away from the bones. Remove the chicken to a plate and tent with foil to keep warm. Simmer the braising liquid for 10 to 12 minutes, or until thickened and saucy. Discard the bay leaf and thyme sprig and season to taste with salt and pepper. Arrange the chicken leg quarters on individual plates, divide the sauce among them, and serve immediately.

Serves 4. Perfect over a bed of long grain white rice. Vary this dish by using morels in the springtime.

*Searing the chicken in this manner adds tons of flavor to the finished dish. For everything you ever wanted to know about searing, plus dozens of fabulous searing recipes, look for my book Seared to Perfection in stores now.

Monday, December 6, 2010

Chocolate Sand Cookies


Here's a recipe for a cookie that's fantastic to bake and give. These cookies are named for their unique sandy texture. Package them with loose leaf tea for a lovely gift.


Chocolate Sand Cookies
Printable Recipe

1 ½ cups all-purpose flour
¼ cup plus 2 tablespoons cocoa powder
¼ cup cornstarch
¼ teaspoon kosher salt
6 ounces (1 ½ sticks) unsalted butter, at room temperature
1 cup powdered sugar
2 tablespoons milk, at room temperature
½ teaspoon vanilla extract

Preheat the oven to 350˚F. Whisk together the flour, ¼ cup of the cocoa powder, cornstarch, and salt in a medium bowl. In a mixer fitted with a paddle attachment, beat together the butter and 1/3 cup of the powdered sugar on medium until creamy. Add the milk and vanilla and mix on low until blended. Add the dry ingredients and mix on low until the dough comes together, stopping the mixer once or twice to scrape down the sides of the bowl. Scoop the dough by the tablespoonful onto parchment-lined baking trays, roll each scoop of dough into a ball, and arrange the balls about an inch apart. Bake for 16 to 18 minutes, or until the edges are firm. Transfer cookies to a rack and let cool for about half an hour, or until barely warm. Sift together the remaining 2/3 cup of powdered sugar and 2 tablespoons of cocoa powder. Roll each cookie in the powdered sugar mixture to coat.

Makes 32 to 34 cookies. Cookies keep for several days in a tightly sealed container in a cool, dry place. Perfect with a cup of Earl Grey tea.

Saturday, November 20, 2010

A Thanksgiving Recipe Roundup and Pumpkin Spice Scones

Turkey day is less than a week away! Thanksgiving menu planning is in full swing, and everyone's focused on pulling off a memorable turkey feast. So in case you need some inspiration, here's a roundup of a few of my personal favorite Thanksgiving recipes. These are the dishes that are on my Thanksgiving dinner table year after year. Oh, and I've also thrown in a new recipe for some Pumpkin Spice Scones, because Thanksgiving breakfast should be special too.

Cranberry-Apricot Chutney – A twist on the traditional, flavored with ginger.

Butternut Squash Soup with Sage Pesto – So good, you may forget to leave room for the turkey. Seriously, it happened to me last year.

Traditional Sourdough Dressing – The quintessential. Nuff said.

Butternut Squash & Potato Gratin – Hello, heavy cream! If Thanksgiving isn't an excuse to use heavy cream with abandon, I don't know what is.

Pumpkin Crème Brûlées – Way better than pie.

Here's wishing you a happy and yummy Thanksgiving!


Pumpkin Spice Scones
Printable Recipe

2 cups all-purpose flour
1/3 cup sugar
1 tablespoon baking powder
¾ teaspoon cinnamon
¼ teaspoon freshly grated nutmeg
½ teaspoon fine sea salt
3 ounces (¾ stick) cold unsalted butter, shredded
1 large egg
1/3 cup pumpkin puree
1/3 cup plus 1 tablespoon heavy cream
2 teaspoons Turbinado sugar

Preheat the oven to 425˚F. Whisk together the flour, sugar, baking powder, cinnamon, nutmeg, and salt in a large bowl. Add the butter and, using a pastry cutter, cut the butter into the flour until the mixture resembles coarse crumbs. Blend together the egg, pumpkin puree, and 1/3 cup of the cream in a small bowl, add to the flour mixture, and stir until just combined. Transfer to a work surface and knead a few times until the dough just holds together. Pat the dough into a 6-inch wide, 1 ½-inch thick circle and cut into 8 wedges. Arrange the scones a couple of inches apart on a parchment-lined baking tray. Lightly brush the scones with the remaining 1 tablespoon of cream and sprinkle with the Turbinado sugar. Bake for 13 to 15 minutes, or until golden brown.

Makes 8 scones. Work quickly and with a light touch to prevent the butter in the pastry from melting. Serve warm, possibly with clotted cream. Scones keep for a day or two in a tightly sealed container in a cool, dry place.

Thursday, November 18, 2010

Wonton Soup


Last weekend I taught a cooking class at Clark College entitled Soup Series: Chinese Favorites, and the Wonton Soup was a big hit. Students enjoyed learning how to fold wontons so much that I just had to share the lesson with you too.

But first, a little bragging…The Steaks with Chipotle Cream Sauce recipe from Seared to Perfection was featured in The Washington Post! And cooking classes are spotlighted in the latest issue of Clark College Connections, with a couple of quotes from, and pics of, yours truly (see pages 94 to 95).

Wonton Soup
Printable Recipe

4 quarts chicken broth
2 cloves garlic, crushed, plus 2 cloves, minced
3 ¼-inch slices ginger, plus ½ teaspoon grated
3 tablespoons soy sauce
½ pound ground pork
¼ pound shrimp, peeled, deveined, and minced
3 tablespoons sliced green onions
1 tablespoon cornstarch
½ teaspoon sugar
¼ teaspoon dark sesame oil
Freshly ground white pepper
About 45 wonton wrappers
1 large head napa cabbage (about 1 ½ pounds), cut into 1-inch strips
Kosher salt

Combine the broth, crushed garlic, sliced ginger, and 2 tablespoons of the soy sauce in a large, heavy pot. Bring to a boil and simmer for about 45 minutes, or until fragrant.

Meanwhile, mix together the ground pork, shrimp, minced garlic, grated ginger, green onions, 2 teaspoons of the cornstarch, sugar, sesame oil, a generous pinch of white pepper, and remaining 1 tablespoon of soy sauce in a large bowl.

Whisk together the remaining 1 teaspoon of cornstarch and 1 tablespoon of water in a small bowl. Place 1 teaspoon of the pork mixture in the center of a wonton wrapper.


Using a fingertip, lightly moisten the edges of the wrapper with the cornstarch mixture. Fold the wrapper in half over the filling, forming a triangle, and eliminating any air pockets, firmly pinch the edges together to seal.


Lightly moisten the corners of the wrapper along the long side of the triangle with the cornstarch mixture. Fold the two corners together.


And firmly pinch to seal.


Make more wontons with the remaining wrappers and filling in the same manner. As you work, arrange the wontons in a single layer on a parchment-lined baking tray.

Discard the garlic and ginger from the broth. Add the cabbage, bring to a boil, and simmer for 3 to 4 minutes, or until tender. Add the wontons and simmer gently, stirring occasionally, for another 3 to 4 minutes, or until just cooked through. Season to taste with salt and white pepper. Ladle into individual bowls and serve immediately.

Serves 6 as a main course. Keep the wrappers and wontons covered with plastic wrap as you work so that they don't dry out. Avoid getting any filling on the edges of the wonton wrappers, or they won't seal. Uncooked wontons may be frozen in a single layer on a parchment-lined baking tray and transferred to a zip-top bag when frozen solid. Wontons keep for several weeks frozen. Add them to simmering broth while still frozen—there's no need to thaw them, just increase their cooking time by a couple of minutes.

Tuesday, November 9, 2010

Peppercorns on the Vine and Steak au Poivre

And cue the impulse buy.


A rare and intriguing ingredient that I've never experimented with before can always get me to part with a few dollars without a second thought. This time it was a jar of intensely fragrant peppercorns on the vine.


Inspiration came even before I could put the peppercorns into the shopping basket, and I knew the perfect thing to make with them: the Steak au Poivre with Red Wine Sauce recipe from Seared to Perfection.

Just a couple of things before I get to the recipe…

Here's my interview on Savor Portland, in case you missed it. We chatted about everything from the release of my book to government cheese—good fun. The day after that appearance, Seared to Perfection was written up in the Winston-Salem Journal.

Also, registration for winter Clark College cooking classes is now open. I'm very excited to offer Spanish Paella Supper, Hands-On Fresh Pasta, Hands-On Asian Appetizers, Valentine's Seared to Perfection II, and Real Texas Chili classes and hope you can join me in the kitchen! Current class listings can always be found in the Cooking Classes, Book Signings & Appearances sidebar on the right.

And without further ado, may I present a glimpse of what's inside the pages of my book…


Steak au Poivre with Red Wine Sauce
Printable Recipe

4 1 to 1 ¼-inch thick rib-eye or strip steaks, weighing about 12 ounces each
Kosher salt
2 tablespoons freshly cracked black peppercorns
2 tablespoons extra virgin olive oil
1 shallot, minced
½ cup red wine
½ cup beef broth
2 sprigs fresh thyme
2 to 3 tablespoons cold unsalted butter, diced

Season the steaks generously with salt and set aside at room temperature for about half an hour.

Coat the steaks with the pepper, pressing it gently into the meat. Heat a large, heavy sauté pan over high heat until very hot but not smoking. Add the oil and swirl to coat the bottom of the pan. Add the steaks and cook without disturbing for 4 to 5 minutes, or until they release from the pan and are crusty and brown. Using tongs, turn the steaks and continue to cook over high heat another 2 to 3 minutes, or until the desired doneness. Moisture will just begin to accumulate on the surface of the steaks when they are medium-rare. Remove the steaks to a plate and tent with foil to keep warm.

Reduce the heat to medium, add the shallot to the pan, and sauté for 30 seconds, or until translucent and fragrant. Add the wine and simmer for a minute or so, scraping up the brown bits from the bottom of the pan with a heat-proof spatula. Add the broth and thyme and simmer another 5 to 6 minutes, or until thickened and saucy. Remove the pan from the heat, discard the thyme, and let cool for a minute or two. Whisk in the butter quickly, stir in any accumulated juices from the steaks, and season to taste with salt.

Arrange the steaks on individual plates, divide the sauce among them, and serve immediately.

Serves 4. No bistro menu would be complete without steak au poivre, the classic French dish of tender steak encrusted with crushed black peppercorns. Although the recipe calls for what seems like an enormous amount of pepper, high heat works an amazing transformation on the pungent spice—the peppercorns become toasted and mellow. For this dish, the peppercorns should be coarsely crushed, not ground to a powder. Crack whole black peppercorns with a spice mill or in a mortar and pestle. Alternatively, place them in a zip-top bag and tap them with a rolling pin or the bottom of a small frying pan.

Wednesday, November 3, 2010

Behold, the Perfect Rib-Eye

Most steak connoisseurs agree, the rib-eye is the ultimate steak. It offers the perfect balance of flavor and tenderness, and it's ideal for grilling, broiling, and searing. No other cut of steak can satisfy carnivorous cravings in quite the same way. When you're selecting a rib-eye from the meat case, here's what to look for…


1. A relatively small eye. The eye meat is tasty, but even better is…

2. A relatively large cap (also known as lip, lifter, or deckle), which any rib-eye aficionado will tell you is the best part of the steak. The most perfect rib-eye has about as much cap meat as eye meat. If I could get a cap steak, I would. By the way, a large cap indicates that the steak came from the chuck end of the rib.

3. Only a small lump of fat. Every rib-eye steak has a fat mass that's situated between the cap and the eye. The smaller it is, the better. However, fat is desirable when it comes in the form of…

4. Ample marbling. These flecks of fat melt as the steak is cooked and keep the meat moist and succulent. Prime grade steaks have the most marbling and also the highest price tag. Choice grade steaks are relatively affordable and often have impressive amounts of marbling. Select grade steaks have little to no marbling and are hardly worth eating.

5. A thickness of approximately 1 ¼ inches so that each bite has a good ratio of seared surface to juicy, tender interior. Also, look for a steak that's cut evenly so that it cooks evenly.

6. Small overall size. Ideally one rib-eye steak should equal one serving, and each diner should get a steak of his or her very own so as to avoid sharing and the inevitable fisticuffs over who gets the cap end.

Incidentally, this particular rib-eye steak is grass fed, grain finished, ungraded (but looks like choice), and wet aged (dry aged would be even better). It's just less than 1 ½ inches thick and weighs in at about 12 ounces.

Wednesday, October 27, 2010

A Croquembouche for Nine Years

Today the husband and I celebrate another year of wedded bliss. I made a little surprise for him for our special day.


Happy anniversary, Hubby! Love you!

Friday, October 22, 2010

A Deep Breath and a Potato Gratin Variation

Aahhhhhhhhhh.

A deep, cleansing sigh of relief. Now that Seared to Perfection has been out for a couple of weeks, I can tell you—I haven't exhaled since 2006, when I first came up with the idea. To tell you the truth, I'm not sure I ever believed it would really happen until I finally held the finished book in my hands.

Dreaming up one hundred recipe ideas and then developing and testing them, writing the manuscript—that was the easy part. Finding an agent to represent me and then selling the book was tough. But the really hard part was turning everything over to the publisher and waiting. And waiting and waiting. And feeling like I had given up control. Of course I knew in my head that I was handing my work over to talented professionals who had my best interests at heart and who were obviously working very hard to make the book the best it could be, but still…

I was a nervous wreck when I received the initial revisions—I had to give myself at least twenty-four hours before opening email attachments, lest I take the changes personally. It didn't help that I never got to meet the editors in person and put faces with their names, or shake their hands. They're only three time zones away, but they seemed so distant they might as well have been on the moon. Email correspondence with only an occasional phone call can do that. I must admit that to this day, I'm still confused by all the different people with "Editor" after their name.

It was a rollercoaster ride. The deadline was reeled in, meaning I had to deliver the manuscript a few months early. A decision was made to include photographs. The book was to be released in the fall of 2009. The release was pushed back a year, the idea of photographs was scrapped. I told myself that an affordable book released after the economy recovered would be a good thing.

Then after a long hiatus another editor made contact, and the rounds of proofs began. I would lock myself in my office, red pen in hand, with only my computer to keep me company. Frenzied proofreading followed by periods of more waiting. I would get word of editors flip-flopping, changing "Give it a rest" to "Why does food need to rest?" and then back again (for the record, I still relish the win on that one). I would be consulted on recipe order or cover photos or book design and wonder if I was driving everyone crazy with my suggestions, requests, and nitpicking. "The bottom of the title page looked like a cayenne red in the PDF and it looks more like a maroon on the hard copy," I would complain.

By this time I was generally convinced that I was working with good people who could be reasoned with. They always respected my opinion, and the design surpassed my expectations. But a new fear gripped me—soon this thing I had labored over for the last four years of my life would be out there, for all the world to see and to criticize. My first look at the finished book was accompanied by excitement and also a bout of nausea.

Why did I get myself into this?

As it turns out, there was no need to panic. The first reader reviews on Amazon are exceedingly positive, and my searing cooking class at Clark College sold out. Helpful friends have taken it upon themselves to rearrange bookstore shelves to bring Seared to Perfection to eye level. And the book is even getting a bit of attention in the media! StarTribune.com featured the recipe for Chicken Breasts with Mushroom, Paprika, and Sour Cream Gravy, and here's the interview with yours truly in The Oregonian's FoodDay. My appearance on The Faith Middleton Show was a total love-fest and catapulted the book up to number six on Amazon's list of Bestsellers in Culinary Arts & Techniques. (For a while it even reached number ninety-four on Bestsellers in Cooking, Food & Wine and 1,324 in all books—I'm such a proud momma!) I'll be on KOIN Studio 6 between 4PM and 5PM on Friday, December 17th demonstrating a recipe from the book.

Would I do it all over again? Hell yes. Without a doubt. I'd jump at the chance. In fact, I have an idea for the perfect follow-up to Seared to Perfection. Let's hope my publisher goes for it.

Now that I've gotten all that off my chest, I really need some comfort food. So here's a seasonal variation of the Potato Gratin recipe in the book.


Butternut Squash & Potato Gratin
Printable Recipe

Unsalted butter, for greasing the baking dish
4 large (about 2 pounds) Yukon gold potatoes, peeled and sliced 1/8-inch thick
1 1 ½-pound butternut squash, peeled, seeded, and sliced 1/8-inch thick
Kosher salt
Freshly ground black pepper
Generous pinch nutmeg
1 clove garlic, grated
1 ¾ cups heavy cream
1 cup shredded Gruyère

Preheat the oven to 325ºF. Generously butter a 12-inch oval baking dish. Season the potato and butternut squash slices to taste with salt and pepper. Layer them into the dish, arranging them in neat, overlapping circles and alternating layers of potato and squash. Stir the nutmeg and garlic into the cream and slowly pour over the potatoes and squash. Sprinkle evenly with the Gruyère. Bake for 1 ¼ to 1 ½ hours, or until the top is golden brown and the potatoes and squash are tender. Cover with foil to keep warm and allow to rest 20 to 25 minutes before serving.


Serves 6. Make this gratin in the fall, when butternut squash is abundant and rich food is welcome. Yukon gold potatoes will become creamy but retain their texture after cooking. A mandoline makes easy work of slicing potatoes, but I prefer to slice the squash with a chef’s knife. Season the gratin carefully before it goes into the oven because it’s hard to add salt and pepper once it is cooked. I toss the potato and squash slices with salt and pepper in a large bowls and taste a bit of each raw to check the amount of salt—they should taste slightly salty at this point for a perfect finished gratin—and spit it out. Minced fresh thyme or sage can be added along with the salt and pepper. Letting the gratin rest before serving makes it possible to cut neat portions.

Monday, October 11, 2010

Two Dinner Parties, One Dessert

Two dinner parties in one weekend and I was responsible for bringing dessert to both. We were treated to endlessly flowing wine and grilled leg of lamb with homemade pita bread one night and a Canadian Thanksgiving feast, complete with a twenty-something-pound roast turkey (which I was volunteered to carve), the next. My, what wonderful, generous friends we have!

Needless to say, dessert had to impress. A recent trip to the orchard to stock up on apples and pears—'tis the season here in the Pacific Northwest—meant I didn't have to look far for inspiration.


My Chocolate-Pear Tarts would be good enough for both parties.


This is a dessert born of leftovers—years ago, after finding myself with extra chocolate tart filling and a few too many poached pears after a multi-day baking spree, I decided to combine the two together in one dessert. Whether it was serendipity or just utilization, the results were divine, and this tart has been in my repertoire ever since.

Chocolate-Pear Tart
Printable Recipe

3 ounces heavy cream
3 ounces milk
4 ounces semisweet chocolate, chopped or scant 2/3 cup semisweet chocolate chips
1 ounce egg
3 Pears Poached in Port, at room temperature
1 partially baked 9-inch Pâte Sucrée Tart Crust

Preheat the oven to 350˚F. Combine the cream and milk in a small, heavy saucepan and bring to a bare simmer. Place the chocolate into a medium bowl, add the hot cream mixture, and whisk until smooth. Let cool slightly. Gradually whisk the chocolate mixture into the egg.

Pat the pears dry with paper towels. Halve and core the pears and slice them thinly, keeping the slices together so each pear half stays intact. Using a spatula, transfer the sliced pear halves to the tart crust, arranging them in a radial pattern with their stem ends at the center of the crust. Press down gently on each pear half to fan out the slices slightly. Using a pitcher or batter bowl with a spout, slowly pour in the chocolate mixture, being careful not to pour it directly over the pears. Bake for 18 to 20 minutes, or until just set. Let cool to room temperature. Refrigerate for 2 to 3 hours, or until firm. Cut the tart into portions and serve immediately.

Makes 1 9-inch tart, serving 8. This tart is perfect in the fall, when Bosc pears are in season. The pears may be poached up to a day in advance and stored submerged in their cooled unreduced poaching liquid. To measure 1 ounce of egg, crack 1 egg into a bowl, lightly beat it with a fork, and weigh it out using a scale. You can tell that the tart is done when the chocolate filling jiggles like gelatin. Serve with the reduced poaching liquid sauce from the Pears Poached in Port and lightly sweetened whipped cream, if desired.

Wednesday, October 6, 2010

Announcements

Now that Seared to Perfection: The Simple Art of Sealing in Flavor is out, it's time for me to begin *buy* shamelessly *buy* plugging *buy* my book!


So check this out: Seared to Perfection is reviewed on NorthWest Stir and featured in the charming fourth webisode of Recipe Runway (watch at the six minute mark).

Also, mark your calendars for these upcoming book events with yours truly. Please do come out and say hello—I'd love to meet you!

· Searing Pastured Meats cooking class at Salt Fire & Time Community Supported Kitchen in Portland, Oregon at 6:30PM on Wednesday, October 13. A signed copy of my cookbook is included in the price of the class.

· Seared to Perfection cooking class at Clark College in Vancouver, Washington at 6PM on Wednesday, October 20. I guarantee you'll learn to sear like a chef! The menu includes: Steak au Poivre with Red Wine Sauce, Salmon Fillets with Garlic-Dill Butter, Cauliflower with Capers and Parsley, and Pineapple with Vanilla Ice Cream & Coconut-Caramel Sauce. Only a few seats remain, so sign up soon.

· Interview on WNPR's The Faith Middleton Show at 3PM EST on Thursday, October 21. Click to listen live.

· Community Feast & Book Signing at Salt Fire & Time Community Supported Kitchen in Portland, Oregon at 7PM on Friday, October 22. With a menu inspired by my cookbook.

· Interview on PDX.FM's Savor Portland webcast at 4PM PST on Tuesday, October 26. Click to listen live.

· Book signing at Einmaleins in Olympia, Washington from 5PM to 9PM on Friday, November 5. Einmaleins is a very cool independently owned cookware shop featuring modern European design, and this book signing is a part of First Friday festivities.

And more stuff is in the works, so stay tuned. A list of my upcoming cooking classes, book signings, and appearances can always be found in the sidebar on the right.

Monday, October 4, 2010

Quality Time in Austin

An almost last-minute trip to Texas to visit family had me completely distracted from the kitchen all last week. No cooking but certainly plenty of eating…

The Dallas and College Station contingents of the fam arranged a 24-hour meet-up in Austin. My only agenda was to rack up some quality time, so this time all of the destinations were chosen by my little brother.
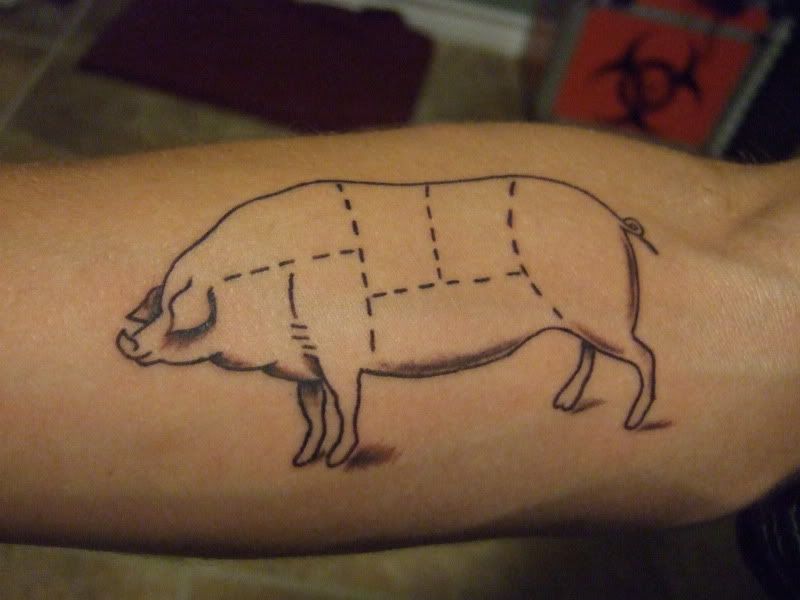

Judging by the new tattoo of a pork primal chart on his inner forearm, he could be trusted to pick out some delectable destinations.

The franks at Frank were creative, to say the least. After indulging in a basket of waffle fries topped with chorizo, green chiles, and cheese, Little Brother and I split two different dogs. The Notorious P.I.G., a housemade pork, bacon, jalapeno, and sage dog topped with macaroni and cheese and tangy barbeque sauce, underwhelmed.


But the Chili Cheese Dog was as good as they get, with a generous amount of meaty, spicy chili.


Although ordering it "porked", which in Frank's vernacular means split, stuffed with cheese, wrapped in bacon, and fried, seemed slightly dirty and turned out to be superfluous—I couldn't even taste the bacon under all that chili. My only complaint about Frank is that if they remove items from the menu (like the much anticipated chocolate whoopie pie), it's time to do a reprint. Oh, and the wiener lady really ought to have worn baloney slices for a bra.


Between lunch and dinner, we stopped by Houndstooth Coffee, where we literally and figuratively took in the latte art, Austin Homebrew Supply for some shopping (turns out there really is such a thing as corn sugar and it's used for making beer, not sweetening all manner of processed foods, and my beer-brewing brother needed to stock up), and Breed & Co. to browse the cookware.


For dinner, Little Brother picked out the Odd Duck Farm to Trailer food cart, a place with a BYOB party atmosphere.


And local food worthy of a white-tablecloth restaurant.


Again, we made a food-sharing agreement which included the pork belly and marinated eggplant slider.


And the grilled quail with Texas rice, apple, and cheddar salad.


The plates were on the petite side, so I could've eaten it all myself, but then I wouldn't have had room for my third of a Son of a Peach donut, shared with my little brother and also his little wife, from the neighboring Gourdough's Big. Fat. Donuts. cart.


Then, just to make sure we didn't go to bed hungry, we went to some old-fashioned frozen custard place for second dessert. Little Brother and I got our cones without incident, but just as the clerk was about to hand over chocolate-dipped cones to Mom, Dad, and Sister-In-Law, some man popped out of a nearby truck and stole them! Can you believe a full-grown man with a straight face actually snatched their ice cream and sped off?! And then the clerk who unquestioningly served the thief denied my family their cones until they presented the receipt! The absurdity.

Anyway, Peter Pan Mini Golf turned out to be the perfect place to work off dinner and desserts. I'm proud to say I won second place even though I don't play golf.

The next morning, between breakfast tacos at the Counter Café and gyros at Milto's, we went for a stroll along Austin's eclectic South Congress and discovered Big Top Candy Shop.


The fun, quirky little store featured oodles of old-fashioned candy, fresh caramel corn, shakes and Italian sodas, and a soda jerk who looked like she could've used another helping of all that sugar.


All in all, more fun than going to the circus and no creepy clowns, either.


My purchase, by the way, was a pack of the flavorless Nihilist Mints, haha!


A fun and flavorful 24 hours it was. But definitely not satisfying. I can't get enough of Austin, and I never get enough quality time with the fam. Time to start planning my next visit…
Blog Widget by LinkWithin